Wednesday, November 26, 2014

Tommy Arashikage, Code Name: Storm Shadow (G.I. Joe Project)

So it was probably about time I got some more done with my G.I. Joe project. For some time I have been working a bit on and off with everything, but the G.I. Joe project was  never forgotten, it has just been a bit dormant lately.

I have been buying a few new miniatures which I wanted to use, some didn't fit in, while other will need a little work.

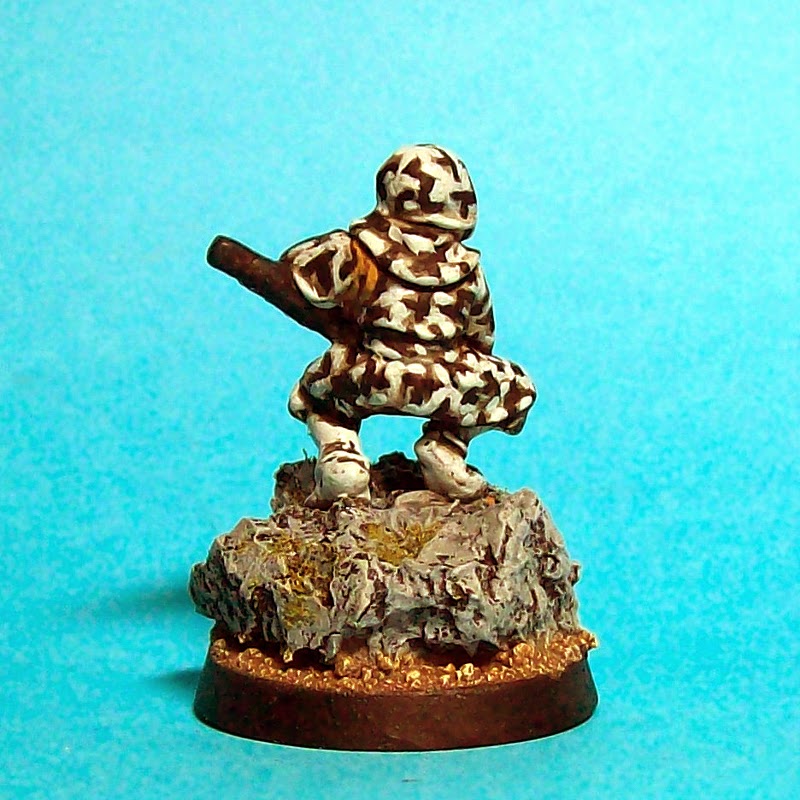
The latest miniature I painted was Storm Shadow. Storm Shadow is another of my favourite characters from the comic book series. Some times he works for Cobra, other times for the Joes and most of the times probably for his own clandestine agenda.

I had some trouble finding a miniature I liked to represent him. There was the ninja from Reaper Miniatures, but I was never really sure about that one. So one day when I looked at the old Citadel ninja range I decided to get one of them for my Storm Shadow. it took some time, but I got him and when he arrived in the mail I quickly decided he was just too small in scale and with his crouching pose he looked even smaller compared to the Perry Miniatures ninjas.

Eventually I decided to try and put him on a taller base and I really think it worked out well. I decided to paint him in the V2 camouflage suit. I always liked a ninja in camouflage and in this carnation he could work with the Joes.

Storm Shadow and Jinx is ambushed by their renegade ninja clan.


Storm Shadow vs Red Ninja Leader.

I still think he looks a bit small, but he is Japanese after all, so it is ok and putting him on the scenic base really helped out. For now he is my G.I. Joe version of Storm Shadow. Later I will probably add a Cobra version, but for now he even out the odds with Jinx and Storm Shadow on the Joe side and five Arashikage ninjas on the Cobra side.

Some W.I.P. and scale shot.

Other than that I am also working on a Scarlett and Timber. Both are from Reaper Miniatures. I have filed and sculpted a bit on Scarlett. When she is done I will do a blog post about her.

My version of Scarlett is inspired by one on the Mini-Ventures Blog, a blog with loads of great stuff if you are into G.I. Joe. I plan to take a lot more of the ideas from there and use them on my own project. After all imitation is the sincerest form of flattery (I hope).


Friday, November 7, 2014

Rebuilding My Cacti Patch

Back in 2013, when I started this blog, one of the first things I posted was my Deathworld Cacti turtorial, but I was never 100% satisfied with how they turned out back then and for some time I have been working on upgrading and rebuilding the cacti patch.

The finished and rebuild cacti patch.

First of all I wasn't satisfied about how the CD bases looked too uniform on the table. At first it didn't bother me that much, but it was annoying me more and more as time went by, so I began searching for an alternative.

After some time I decided that I wanted some lasercut bases, it would not be the cheapest option, but probably the best option considering price and time spent on it all. There really is a lot of lasercut stuff to chose from on the internet, but in the end I found a cheap solution on Ebay and ended up with 80 terrain bases in a mix of different shapes and sizes.

Top view of the finished pieces.

Another thing I wanted was for the terrain to fit into the plastic boxes I use for storage of my terrain. I had bought them to fit the CD bases, but as it turned out they were a bit too small for that. 

So when I started the rebuilding I first chose some bases which would fit the box. I put an A4 paper in the box and drew the outlines of the bases and I numbered the bottom of the bases, so I will always be able to easily fit them back in the box for storage.

Some Marines defend themselves against an Ambull onslaught.

The ARBCO silo.

"So for a good bean soup you need beans, onions, potatos and... wait, did you hear something?"

Marines being monitored by Inquisitor Gar.

Backside (or front) of the ARBCO silo.

Detail of the top of the silo.
On top of the silo I used some diluted woodglue, to which I added some orange/brown paint, I poored it onto the silo and left it to dry. Which gave the result of the dried in pool of rusty/dirty water. I think the effect worked out quite good.

Below is some WIP of the process. I took off the cacti from the CD bases, some of the cacti had their spikes re-done and all needed slight update on paint and such stuff.

Chosing what cacti to put where.

Progress.

Bases painted and spikes added to the cacti.

I chose to do the cacti on their own and finish the bases before I stuck them on. They would need some work after attaching, but it would eliminate some of the problems about painting around the spikes and all.


Tile adhesive added to give structure.

First layer of paint.

Almost done, the silo needs paint and I added some grass to the bases.

The cacti patch is not the only terrain I have been working on lately and below is a few pictures of some of the other stuff I have finished.

A stone circle from some resin stones I bought once.


Quite big plants.

Some easter eggs.

A spread of the combined terrain.

I'm rather pleased I must say.

As you can see these cacti and friends are not nearly enough to cover a whole table yet. But I do have a few other things which didn't make it to this photo-shoot.

I plan to make some more boxes of terrain and try to make them a bit themed. So I want to make one more box of cacti, this is the most important instant old school terrain feature and I think doubling the amount of cacti will look impressive on any table.

Besides that I have plans for a box of mushroom terrain, some boxes of sci-fi jungle terrain. more bunkers, silos, containers and generally i just hope to end up with a lot of different terrain and still try to keep it useful together in any mix or match.